Variant images in a drop shipping workflow can be particularly painful to your conversion rates. When importing products from supplier feeds or AliExpress for example, a single product gallery may contain 30 images. Of those images, there is often a handful with watermarks, incorrectly labeled colors, small etc. and a customer ends up selecting a red product only to be shown an image of the blue version destroying your conversion rates.
Step by step guide to cleaning up supplier images and outlines process for selecting supplier images to keep, renaming and tagging supplier images before import, assigning supplier images to product variants and replicating process for next 50 products in 50 hours, not 50 hours per product.
In this post
- The dropshipper image problem
- Pre-import cleanup
- Mapping images to variants
- Automation shortcuts
- FAQ
The dropshipper image problem
It’s also worth mentioning that many of the 3ds sell on apps such as 3D, DSers, AutodS, Spocket etc. Some of these apps can import product images directly from the supplier’s website. Suppliers are not photographers so normally their product images will look more like this:
- 20 to 40 photos, most of them duplicates or near-duplicates
- Random filenames like 1.jpg, 2.jpg, sometimes in Chinese characters
- No variant mapping at all, or wrong mapping
- Mixed quality: some studio shots, some phone pics, some marketplace watermarks
- Size charts, comparison shots, and branding graphics mixed in with product photos
Shopify loads galleries of all images for a single product on the product page. After reviewing what I got to work with (from the image audit tool) I was surprised and even shocked at how much work I would put into to get a decent experience for my customers.
Pre-import cleanup
Cleaning up the code before or after import. I cleaned up the code before import. It is easier because the default Shopify provided CSV files are hard to alter. However, most people add images after product import. Same steps apply.
Step 1: Triage. For each colour/variant try to work out how few photos you can get away with to really get a feel for the product. In reality, five photos per variant are always a good starting point. Front, back, side, close-up and lifestyle. Two great red photos are better than ten poorly coloured photos.
Step 2: Rename. Rename files so the variant is in the filename. Something like tshirt-red-01.jpg, tshirt-red-02.jpg, tshirt-blue-01.jpg. I know this step sucks, but it’s by far the most useful thing you can do because AI auto-assign tools read filenames to map images to variants. Use the image renamer tool for bulk rename, or the filename generator to build a nice pattern to rename with.
Trim Supplier Images. Many supplier photos are far too large (about 3000 pixels wide). For web use, we will resize the photo to no more than 1500-2000 pixels wide and then compress the image. Don’t forget that now this image is not only smaller, but it can also help to reduce the file size of your mobile product page. Read more about shrinking your images in 8 Ways to Image Compress.
Step 4: Alt text. Include basic alt text for the t-shirt describing the colour, i.e. ” Red cotton t-shirt, front view.” This will assist with the SEO for the webpage and ensure the correct map images are selected and recognised by AI software to utilise as thumbnail images. Read the filename and alt text SEO guide.
Mapping images to variants
After naming objects and cleaning up your images, you can decide how you want to assign those images to variants for the test. You have three options for how to do this.
Option A: Manual. For each of your 200 products, open up the product in the Shopify admin and add one manual upload for each variant manually assigning the correct image in the native Shopify image upload tool. This method only allows you to assign one image per product and can only be done within the Shopify interface. It means that you see one image per color with no filtering and the entire gallery is viewable. Manually uploading all of your products this way is very time consuming and not recommended for more than 2 products.
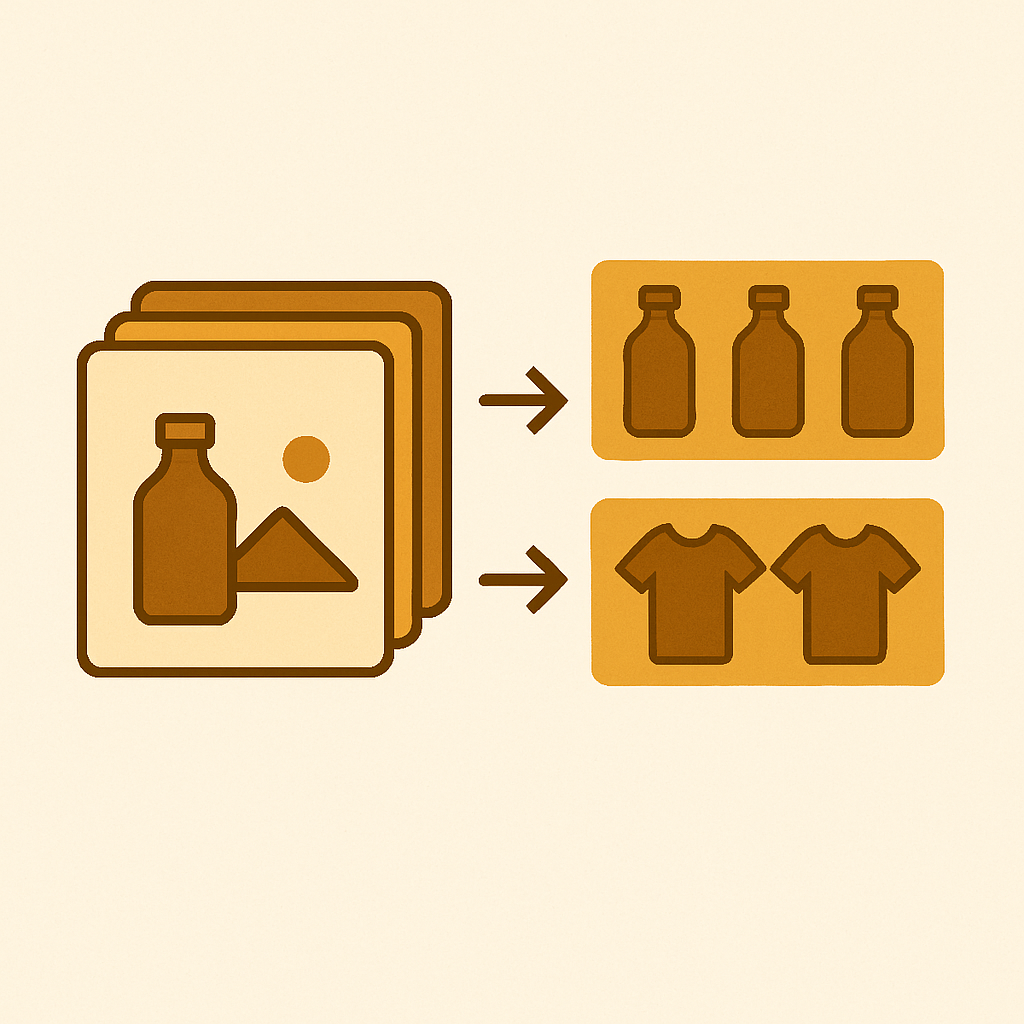
Option B: AI auto-assign: This option requires the installation of the app called Rubik Variant Images. The app uses a combination of product name, variant name, image file name, and alt text to accurately assign the images to the product variants. This app assigns images one product at a time. The app is very accurate and if you include the color in the file name it will be even more accurate. Read more here: http://rubikvariantimages.com/.
Option C: Bulk assign by image order. Also in Rubik. This app uses the Shopify gallery order with featured image boundaries to split photos into variant groups without using any AI or looking at file names. This app is best suited for dropshippers who control the upload process and upload images in a strict order (e.g. all red images first, then all blue images, then all green images etc). There is no learning required. You simply upload images and have the variants automatically assigned.
AI Auto-assign is faster and cleaner to use if your file names have clean names i.e. not a bunch of garbage and spaces in the file name. Bulk assign is less smart for assigning products but it does not require any filename manipulation like AI does. Many dropshippers use both functions for assigning products. They use AI for the product where there is enough supplier information in product record to accurately assign. Then they use Bulk assign to add products with new images to the appropriate suppliers with zero filename modification required.
Automation shortcuts
A few things that pay back the time investment.
- Template your filename convention. Decide on
{product-slug}-{color}-{number}.jpgand never deviate. Six months later you will be glad. - Use folders per variant when storing images locally. A folder named “red”, a folder named “blue”. Your brain maps faster and bulk upload is cleaner.
- Batch CSV imports. Shopify CSV supports image URLs. Build one row per variant with the image URL column populated. See the product CSV import guide.
- Use a grouping planner. The grouping planner tool helps you map out which photos belong to which variant before you start clicking.
- Don’t import and forget. Always do a visual spot-check on the live product page. Supplier-imported products lie about variant counts.
If you sell the same product in different product collections, see bottom of page for how to show swatches for different collections. For swatching on collection pages and having same product in different collections link together to list together, see: http://rubikify.com. Read 5 Easy Collection Page Swatches.
Use a simple theme. You can read about Horizon themes here and you’ll need to read the product page optimization checklist if you plan on scaling to 100+ products.
FAQ
Can I assign multiple variant images from DSers directly?
DSers allows you to import supplier product images into a gallery. However, you will need a separate application to actually use the imported images because DSers does not currently allow you to upload supplier images to individual products. Currently, images uploaded to DSers import into one gallery and can be viewed by customers in a photo view mode, however each product in your Shopify store can only have one image uploaded with multiple images in gallery form.
Does AI auto-assign work with Chinese filenames?
Partially. Rename the files before import to Plain ASCII using the color word in English or the color word of your store.
How many images per variant should a dropshipper aim for?
Five. For me, this means having a decent set of front, back, side and close up views, and perhaps a few lifestyle shots. More is ok but fewer is perfectly fine. The key is to signal that you have put some thought and effort into providing the images and five is a good number to go with.
What about watermarked supplier photos?
These fakes are very damaging to your brand and can take trust away from your buyers. Disclosure: There are probably terms of service on the marketplace that you sell on that would prohibit the use of these fakes. You have a couple of options, you can choose to re-shoot these product using the real items, go back to your supplier and get some more clean product images or you choose to sell the product but not use these images.
Does Rubik work with imported dropship products?
Yes. It reads your Shopify product data regardless of how the product got there. Free plan for one product, then flat pricing at $25, $50, or $75 per month.
Can I bulk assign variant images by CSV?
Shopify can import from a Shopify CSV file that includes image URLs for each variant. However, only 1 image will be uploaded per variant (this is a native Shopify limit) – you can upload more images per product using an app after the import has been completed.
What is the fastest workflow for 100 products?
Rename files with colors in their names, upload from CSV and do an AI auto-assign. It took an afternoon to spot check about 10 products for mistakes that I had to manually correct, but it was way faster than individually making the product change.
Related reading
- Shopify product CSV import guide
- Bulk upload product images
- Image filename and alt text SEO
- Multiple images per variant, complete guide
- Rubik Variant Images docs
Try Rubik Variant Images
AI – automatically assign products based on artificial intelligence as well as manual bulk assign by image order. AI is designed specifically with dropshippers in mind, trying to deal with supplier galleries that are often messy and unorganized. Free plan available. Install from the Shopify App Store.