Shopify image management: a complete guide for growing stores
Shopify image management can make or break the look and feel of an online store compared to a website under construction. Don’t worry about it until you hit about 20 products. By the time you hit 200 with 8 images per product, you are naming and organizing 1,600 images, compressing files, adding alt tags and assigning images to variants. At 1,000 products, it becomes one of your main operational workflows. Picture a catalog of 3,400 products with no naming convention at all, every file still called IMG_4829.jpg or Screenshot 2025-03-14.png. Nobody can find anything, Google can read nothing, and no bulk tool can match a file to a product. We build Rubik Variant Images, which assigns a separate image set to each variant, so we see that particular mess from the inside more often than we would like.
Shopify image management for the scaling store. Covers hard limits, file naming, directory organisation, CDN behavior, file compression, variant images, bulk image actions and the software required to manage everything.
If your store has more than 100 products and you do not have an image management system, this is the post to read before your catalog reaches that state and nobody can find anything. From losing sales to looking sloppy in front of a customer who is comparing you to three other tabs, this post outlines what goes wrong when a store’s image workflow fails.
Short answer: Shopify allows 250 media per product, 20 MB per file, and only one image per variant. Everything else is your system: naming, compression, bulk uploads. For the variant part, Rubik Variant Images, built by Craftshift, assigns a separate image set to every variant and filters the gallery to match. Free tier, 5.0 stars from 410 reviews.
In this post
- Shopify image limits you need to know
- Naming conventions that scale
- Organization strategies for growing catalogs
- How Shopify’s CDN works (and what you control)
- Compression and file size optimization
- Variant image management
- Bulk operations: upload, export, edit
- FAQ
Shopify image limits you need to know
Shopify has certain limitations on the number of product images you can have. It’s better to know those limitations before you run into them rather than discovering them at 2am right in the middle of a product launch.
- 250 images per product. This includes images, videos, and 3D models. For most products, 250 is more than enough. For products with 20+ variants and 10 images each, you can bump against it. Plan your image counts per variant before uploading. The variant image calculator helps with the math.
- 20 MB per image. Any single file must be under 20 MB. Most product photos from a professional camera are 5 to 15 MB, so this is only a problem if you are uploading raw or uncompressed TIFFs. Compress before uploading.
- 4472 x 4472 pixels maximum resolution (20 megapixels). Shopify will reject images above this. In practice, you want images between 2048 x 2048 and 4472 x 4472 for product pages. Anything larger is wasted bandwidth. Anything under 1000px wide looks blurry on retina displays.
- Accepted formats: JPEG, PNG, GIF, WebP, HEIC, AVIF. Shopify’s CDN automatically converts to WebP for browsers that support it, so uploading JPEG or PNG is fine. No need to convert to WebP before uploading.
- 1 image per variant (native). Shopify only allows assigning one image per variant natively. Multiple images per variant require an app. More on this below.
For the full list of every Shopify limit: Shopify limits 2026. Use this variant combination calculator to calculate the variant count before Shopify’s hard limit of 2,048 variants is reached.
Naming conventions that scale
Image filenames in code is how Google is going to index the image for SEO, how you will search for the file later, and how some bulk operations will work. So have a good naming convention for images. This is not something you can punt on. It is infrastructure.
All good conventions have three parts: the product identifier, the variant attribute, and the position number.
anvil-tee-blue-01.jpg
anvil-tee-blue-02.jpg
anvil-tee-blue-03.jpg
anvil-tee-red-01.jpg
anvil-tee-red-02.jpg
denim-jacket-black-front.jpg
denim-jacket-black-back.jpg
denim-jacket-black-detail.jpg
Compare that to:
IMG_4829.jpg
DSC_0001.JPG
product (2).png
Screenshot 2025-03-14 at 10.22.png
The first set of text on the image tells Google what the image is made of. The first set of text on the image tells the people in your organization what the image is. The first set of text on the image tells any automated tools for performing bulk uploads (such as importer add-ons) what image is associated with what product by filename. The second set tells nothing. Ever notice how your catalog does it?
Images – 9 Rules for Great Filenames: lowercase with hyphens instead of spaces, no special characters or uppercase extensions. The product handle (the slug from the URL) serves as the base for your filename. Then add the value of the variant followed by a position number in the product collection. Check out our guide on image filename SEO for more in-depth advice. You can quickly bulk rename images with the bulk image renamer if you need to clean up a library of existing images.
Organization strategies for growing catalogs
Shopify doesn’t provide folders for product images; all image files are stored in a flat list within the product record. The “Files” section in the admin area is a global dumping ground with no hierarchy, which is fine for a 50-product store but becomes a disaster at 500 products.
Three strategies that work:
- Local folder structure as source of truth. Keep a folder on your computer (or a shared drive) with one sub-folder per product handle. Every image lives in its product folder, named with the convention above. When you upload to Shopify, you upload from this folder. When you need to find an image, you look here, not in the Shopify admin. This is the simplest approach and it works for most stores.
- Google Drive or Dropbox as team hub. Same folder structure, but in cloud storage. Multiple team members can access it. The photographer drops new images into the right folder, the operations person uploads from there. For larger teams, add a naming convention doc in the root folder so everyone follows the same rules.
- Product tags as virtual folders. Use Shopify product tags to create logical groupings (e.g., “photo-set-summer-2026”, “needs-reshoot”, “images-complete”). Then filter the product list by tag in the admin to see which products need image work. Not a physical folder, but it gives you organization within Shopify.
Shopify is a display system, not a file management system. Organise your source files externally and have Shopify display the site for you.
How Shopify’s CDN works (and what you control)
Images uploaded to your shop in Shopify are served from Shopify’s CDN (Content Delivery Network). Our system uses a fast, globally distributed, and automatic CDN. You don’t need to configure it and there is no additional cost to you. When a customer, living in Tokyo for example, views your product page, the images load from a server near Tokyo, not from your shop’s origin.
What you control: the original file you upload (original quality, dimensions, file name, alt text). What Shopify controls: file compression, file format (Shopify automatically converts image files to WebP), image resizing to fit in different places (products, thumbnails, zoom), and caching of images. When Shopify generates a link to an image for display on the site, it appends size parameters to the URL to the CDN, so that the optimal quality version of the image can be retrieved.
Upload high-quality original images. Do not over-optimize images before upload. Stick to high resolution (at least 2048px on the widest side), and use a high quality JPEG or PNG (e.g. 80-85% quality for JPEG images). It is better to upload a large high quality file than a small low quality file. Do not upload a 400x300px version of your logo, it will look terrible on a retina product page. Do not upload a 20MB TIFF, it will be rejected by Shopify. Shopify’s CDN is very good at resizing images on the fly, so it is not necessary to upload many different sizes of the same image. A single image of roughly 2048-3000px wide (e.g. 2272 x 1695 for a 4:3 aspect ratio) will work best.
Shopify CDNs don’t rename files. So while the path looks like cdn.shopify.com/s/files/anvil-tee-blue-01.jpg your files will still have named, SEO friendly filenames. If you go through the SEO checker you’ll find a number of pages which could use better generic image file names since the current default names all relate to cameras.
Compression and file size optimization
Images tend to account for the largest percentage of the total image weight of a Shopify store. In the example shown here, an unoptimized product image with twelve photos requires 60MB of server space and loads 60MB of content onto the page. Even if lazy loading is used to optimize the page, the first images have to be as lightweight as possible and also score well on the LCP (Largest Contentful Paint) score.
Compression basics: three types matter for Shopify merchants.
- Pre-upload compression. Run your images through a tool like our image compressor before uploading to Shopify. A well-compressed 2048px JPEG at 80% quality is typically 200-400 KB. That is small enough for fast loading and high enough quality for zoom.
- Shopify CDN compression. Shopify applies its own compression and serves WebP automatically. This helps, but starting with a well-compressed original gives better results than relying on CDN compression alone.
- Lazy loading. Shopify themes support lazy loading (images below the fold load only when the user scrolls to them). Make sure your theme has this enabled. It does not reduce file size, but it reduces the initial page load.
Setting target file size for product images: we aim to keep all version of images under 500 KB for the main image, under 300 KB for additional images and under 100 KB for thumbnails. These are not set in stone and ultimately it comes down to your own page speed scores. You might notice that Shopify does not automatically compress images to an ideal size for you. This is because overly compressing images results in a decrease in image quality and blurred lines/rounded edges. This is especially critical for products with detailed images, like the engraving on a watch face versus a simple graphic for a t-shirt. Ultimately, you will have to decide what the ideal target file size is for your product images.
Variant image management
Managing images is no longer straightforward you need a system. 5 color variants x 6 images per color variant equals 30 images for one product. Multiply that by 200 products and you have 6,000 images that need correct assignment.
Shopify allows native variant image assignment 1 image per variant. That is not enough for most stores. See the how variant images really work post for details. To show multiple images per variant, you need an app.
Rubik Variant Images stores information about images that belong to each variant in metafields in Shopify and then filters the gallery on the product page based on the selected variant. There are 3 methods of how to assign images to product variants – manual (by drag and drop), AI powered (per product) or bulk (by order of images) – and the best method for you would depend on the size of your product catalog and the organization of your images.
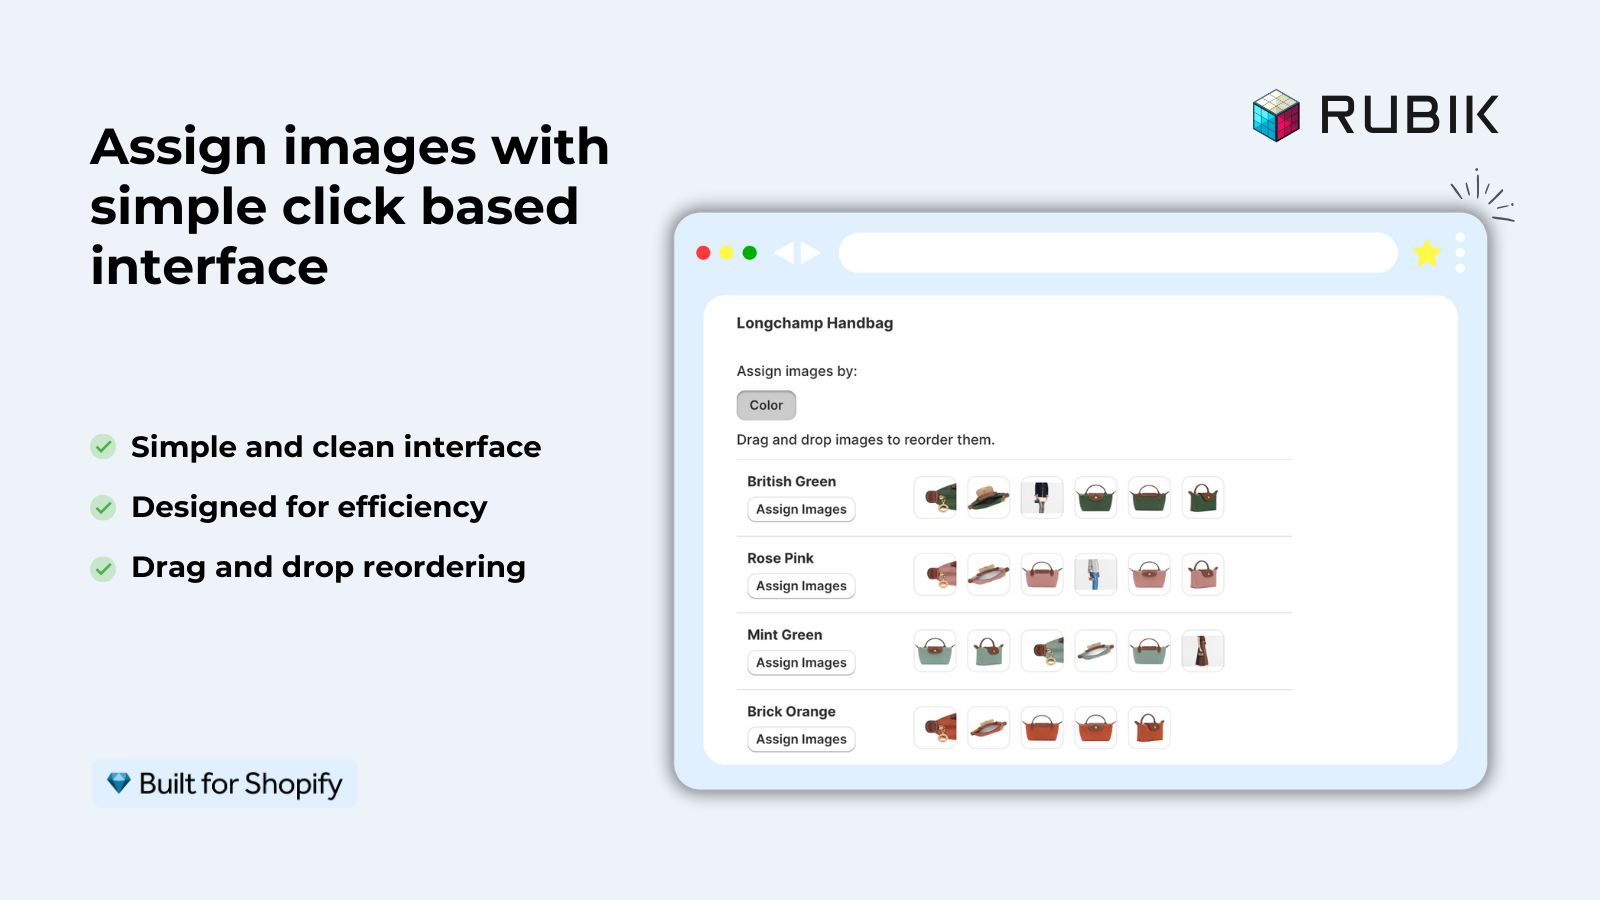
Mapping those by hand is fine for a dozen products. At 200 products with five colors each you are looking at 6,000 assignments, and you redo a slice of them every time a new colorway lands, which is the point where we usually see people go looking for a way to assign a separate image set to every variant and filter the product gallery when a shopper picks an option. No theme code edits, because the storefront rendering is isolated in a shadow DOM. The free tier covers one product; 100 products is $25 a month.
If you have named the image files with the specific variant value (like, anvil-tee-blue-01.jpg) then the AI auto-assign will be able to figure out that for you. But even without that, the bulk assign method will automatically group the images in the Shopify gallery by order. So if you have the blue images uploaded first, followed by the red images, the bulk assign function will still be able to get everything correct and fast. Good naming makes all methods even faster and more accurate, however.
“We’ve tried several solutions for managing variant images, but Rubik Variant Images stands out. It’s like giving our product pages a much-needed declutter. Customers now see only the images that match their selection, which has noticeably reduced the ‘Is this the right color?’ support queries. The setup was intuitive, and the results were instant. It’s one of those behind-the-scenes tools that quietly makes a big difference. Love it!”
Livspace Home, India, 2025-07-10, Rubik Variant Images on the Shopify App Store
For stores where products are indexed by colour with separate products for each colour (as opposed to variants), the image management is actually a lot simpler because it is product by product. However you then need to create combined listings with swatches to display them on the collection pages.
Bulk operations: upload, export, edit
We need a bulk workflow for processing images, because 1-at-a-time doesn’t scale past about 50 products. Here’s why.
- Bulk upload. CS Smart Bulk Image Upload handles drag-drop uploads of hundreds of images with SKU-based matching. Google Drive folder import for larger batches. See the bulk upload guide.
- Bulk export. CS Export Product Images exports all images as ZIP, filtered by collection, vendor, or tag, with folder structure and CSV metadata. See the export guide.
- Bulk alt text. Alt text is the most neglected part of image management. Every image should have descriptive alt text for accessibility and SEO. The Shopify bulk editor can handle this for existing images, but it is tedious. Our bulk alt text editing guide covers the workflow.
- Bulk variant assignment. Rubik Variant Images’ bulk assign processes hundreds of products in background using image gallery order. No manual per-product clicking.
For whatever method I’m automating, I always try to follow a similar pattern of automating the easy part and then manually reviewing the results for accuracy. So whether I’m uploading products, exporting product information, or assigning categories, I always make a batch of records and then check a sample of them to make sure everything is correct.
Image tooling sits inside a wider ops stack, and it is worth checking what else you are paying for before adding another app. Our app stack audit post walks through that. Once the files themselves are in order, the SEO pass (alt text, filenames, schema markup) is covered in the product image SEO guide.
FAQ
What is the maximum number of images per Shopify product?
250 Images (inc. video & 3D models) per product. URL for limit explanation on Shopify’s platform.
What is the maximum file size for a Shopify product image?
20 MB per file. The maximum resolution is 4472 x 4472 pixels (20 megapixels).
Does Shopify automatically compress product images?
Shopify.com uses a CDN for its images which compresses and serves WebP versions of images to browsers that support it. However, it’s always best to start with a compressed original format first before the CDN does any additional compression.
What image format should I upload to Shopify?
File type – JPEG or PNG. Currently Shopify accepts JPEG, PNG, GIF, WebP, HEIC and AVIF formats. The CDNs do automatically convert to WebP format for serving the image, so there is no need to upload WebP format manually.
What is the best way to show multiple images per variant on Shopify?
Shopify assigns one featured image per variant and stops there. That leaves three routes: split every color into its own product, edit the theme code, or run an app. We build Rubik Variant Images for the third route. It stores the per variant image sets in Shopify metafields and filters the product gallery when a shopper picks an option, with no theme file changes. The free tier covers one product, and 100 products is $25 a month.
What should I name my Shopify product images?
What are all of the file names for a product? Use the product handle, the variant attribute, and the position number. Example: anvil-tee-blue-01.jpg. Use only lowercase letters, hyphens, and no spaces or special characters.
How do I bulk upload images to Shopify?
Use a bulk upload application such as CS Smart Bulk Image Upload that uploads images by SKU. Alternatively you can upload products via a Shopify product CSV import file and use the Image Src column public URLs.
Related reading
- Shopify variant images: the complete guide
- Shopify product image SEO guide
- How to bulk upload product images to Shopify
- How many images per variant on Shopify
- Shopify Combined Listings explained
Start with filenames. Seriously. If you fix one thing from this entire guide, a consistent naming convention improves image SEO, makes every bulk operation safer, and stops a 3,400 product catalog from becoming unsearchable. Every other change on this list is easier once the files are named properly.
If the variant side is what you are stuck on, you can see it running before installing anything: the live demo store, the setup walkthrough on YouTube, and the getting started guide.

Umid
Co-Founder at Craftshift