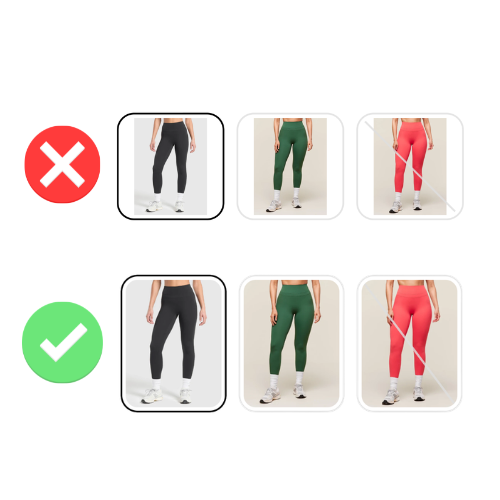
If your product images are in portrait orientation (taller than they are wide), your variant swatches probably have empty space on the left and right sides. The swatch area is square by default, but the image is a vertical rectangle. The result: your product image floats in the middle with blank padding on either side.
This is one of the most common visual issues merchants run into when setting up image-based swatches. The fix takes less than a minute.
We recorded a quick walkthrough showing both options:
Why this happens
By default, swatches in Rubik Combined Listings Swatch use a 1:1 aspect ratio (square). The image inside the swatch is set to “contain” mode, which means the entire image is visible but it scales down to fit within the square boundary.
When your product photo is a vertical rectangle (for example, 800×1200 pixels), it gets scaled down to fit the height of the square swatch. That leaves unused horizontal space on both sides. The image is displayed correctly, but the swatch looks off.
There are two ways to fix this, depending on whether you prefer cropping the image or reshaping the swatch.
Option 1: Change image fit to crop and fill
The quickest fix. In the visual settings editor, change the Image fit setting from “Contain” to “Cover.”
Cover mode fills the entire swatch area by scaling the image up and cropping whatever extends beyond the boundaries. The empty space disappears immediately because the image now fills the full square.
The trade-off: depending on how much your image proportions differ from the swatch shape, some parts of the image will be cropped. For vertical product photos in a square swatch, this usually means the top and bottom edges get trimmed. If your product is centered in the photo, this often looks fine. If important details are near the edges, you might lose them.
Best for: merchants who want a quick fix and whose product photos have the subject centered in the frame.
Option 2: Adjust the height ratio (recommended)
Instead of cropping the image to fit a square swatch, you can change the swatch shape to match your image proportions. This is the better approach when you want customers to see the full product image without any cropping.
In the visual settings editor, look for the Height ratio slider. This controls the height of the swatch relative to its width. A value of 1.0 means the swatch is square. Increase it to 1.2, 1.4, or higher to make the swatch taller.
As you adjust the slider, you will see the swatch shape update in the preview. Keep adjusting until the image fills the swatch without any empty space on the sides. The exact value depends on your image proportions. If your photos are 2:3 ratio, a height ratio around 1.5 will be a perfect match.
The result: taller, rectangular swatches that match your image shape perfectly. No cropping, no empty space. The full product image is visible in every swatch.
Best for: merchants who want the full product image visible in the swatch. This is the recommended approach for most stores.
Which option should you pick?
If your product images are only slightly taller than square, Cover mode (option 1) works well. The minimal cropping is barely noticeable and you keep the clean square swatch shape.
If your images are noticeably vertical (typical for apparel, accessories, and home decor), the Height ratio (option 2) is the better choice. You get the full image with no cropping, and the taller swatch shape actually looks more natural for these product categories.
You can also combine both: adjust the height ratio to get close to your image proportions, then use Cover mode to handle any remaining minor differences. This gives you the most polished result with minimal cropping.
Remember that you can set these values independently for product pages and collection page cards, and for desktop and mobile. You might want taller swatches on the product page where there is more room, and slightly shorter ones on product cards where space is limited.
Different ratios for different products
Not every product in your store uses the same image proportions. Your t-shirts might have square photos while your dresses use tall portrait images. If you set a single height ratio for your entire store, one of those product groups will look off.
Rubik Combined Listings Swatch lets you customize visual settings per product group. Each group can have its own swatch size, height ratio, image fit, and every other visual setting. Your t-shirt group can use square swatches with a 1:1 ratio while your dress group uses taller swatches with a 1.5 ratio. Both look perfect on the same store.
This means you do not need to standardize all your product photography to one aspect ratio just to make your swatches look consistent. Match the swatch shape to each product group’s images and every group looks polished on its own.
The bottom line
Empty space in your swatches makes an otherwise polished product page look unfinished. The fix is simple: either crop to fill (one click) or adjust the height ratio to match your image proportions (one slider). Both options are in the visual settings editor and take effect immediately.