How to watermark Shopify product images in bulk

To watermark Shopify product images in bulk, you need an app that stamps a logo or text overlay across many products at once, keeps your originals safe, and lets you undo the whole thing if you change your mind. Shopify has no native watermark tool, so this is app territory. The good news: bulk watermarking that used to mean a weekend in Photoshop now takes a few clicks and runs in the background while you do something else.
This guide walks through the practical setup: how bulk apply works, how to auto-watermark new uploads so you never forget, how to position and size the mark, and (the part most tutorials skip) how to roll everything back without losing quality. We will use Viking Watermark, a free Shopify watermark app, as the working example because it handles all four of those in one place.
One warning up front, because it bites people later: watermarking your main product image can get you disapproved in Google Shopping. We will cover how to avoid that near the end. Read it before you bulk-apply to your whole catalog.
In this post
- Why bulk, not one at a time
- Bulk watermarking, step by step
- Placement: corner, center, or tiled
- Auto-watermark new uploads
- Rollback and keeping originals safe
- What it costs
- The Google Shopping trap
- FAQ
- Related reading
Why bulk, not one at a time
Picture a catalog with 600 products and four photos each. That is 2,400 images. Watermarking those by hand in an image editor, one export at a time, is a job nobody finishes. You start strong, get bored around product 40, and quietly give up. The half-watermarked catalog that results is worse than none at all, because thieves just grab the clean ones.
Bulk watermarking fixes the math. You set the design once, pick which products to cover, and the app processes everything in the background. The other reason to go bulk: consistency. A watermark that sits in a different spot, at a different size, on every product looks amateur. One template applied across the whole catalog looks like a brand.
If you are already doing large image jobs on your store, this fits the same workflow as a bulk image upload or a catalog-wide rename. Batch work belongs in a batch tool.
Bulk watermarking, step by step
Here is the actual flow once the app is installed. It is shorter than you expect.
- Build the watermark. Choose a logo watermark or a text watermark (your brand name works fine). Set the font, color, and opacity. A live preview shows it on a real product photo so you are not guessing.
- Pick the scope. This is the bulk part. Apply to a single product, to a filtered set (by collection, tag, or status), or to every product at once. Filtering by collection is how most stores do it, so seasonal or clearance images can be left alone.
- Position it. Drag the mark to a corner, center it, or tile it across the whole image. Adjust size and opacity until it reads without smothering the product.
- Run it. Confirm and let it process in the background. Originals are copied to Shopify Files first, so nothing is destroyed.
- Spot check. Open three or four products on the live storefront and confirm the mark looks right on different image shapes. Tall product shots and square flat-lays crop differently.
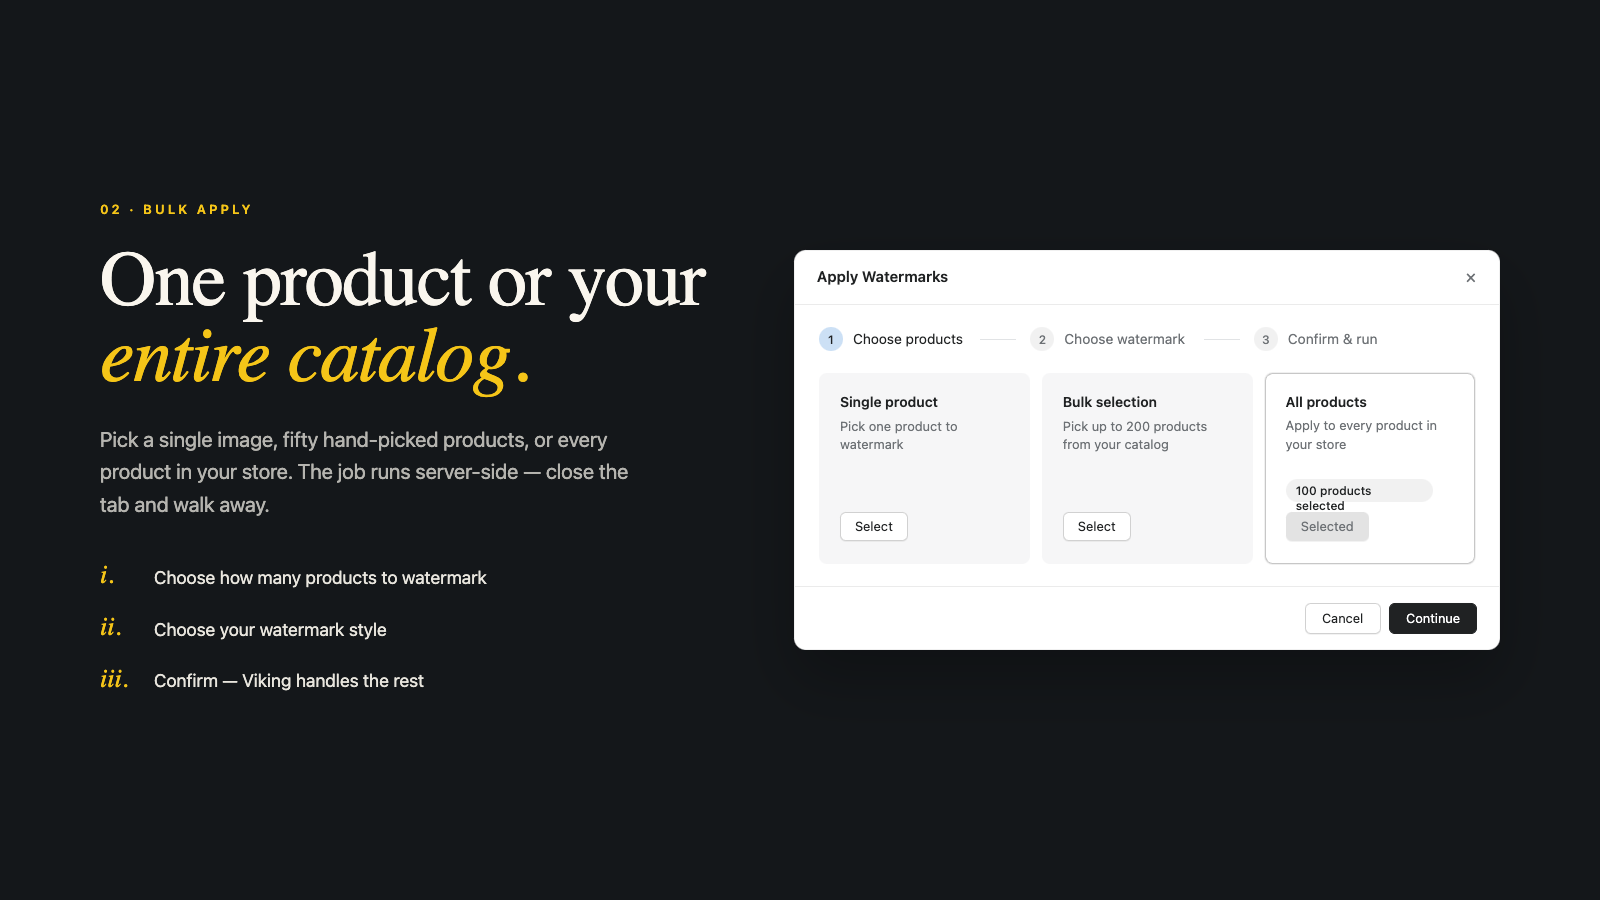
Note one thing about plans: bulk apply and apply-to-all start on the paid tiers. The free plan handles single-product watermarking and storefront protection, which is enough to test the look before you commit to a catalog-wide run.
Placement: corner, center, or tiled
Where you put the mark is a tradeoff between protection and looks. There is no single right answer, so here is how the three modes actually behave.
| Mode | Protection level | Best for | Downside |
|---|---|---|---|
| Corner | Low to medium | Subtle branding, clean look | Easy to crop out |
| Center | Medium | A clear ownership stamp | Sits on the product |
| Tiled | High | Photos you really do not want reused | Busy, harder on the eye |
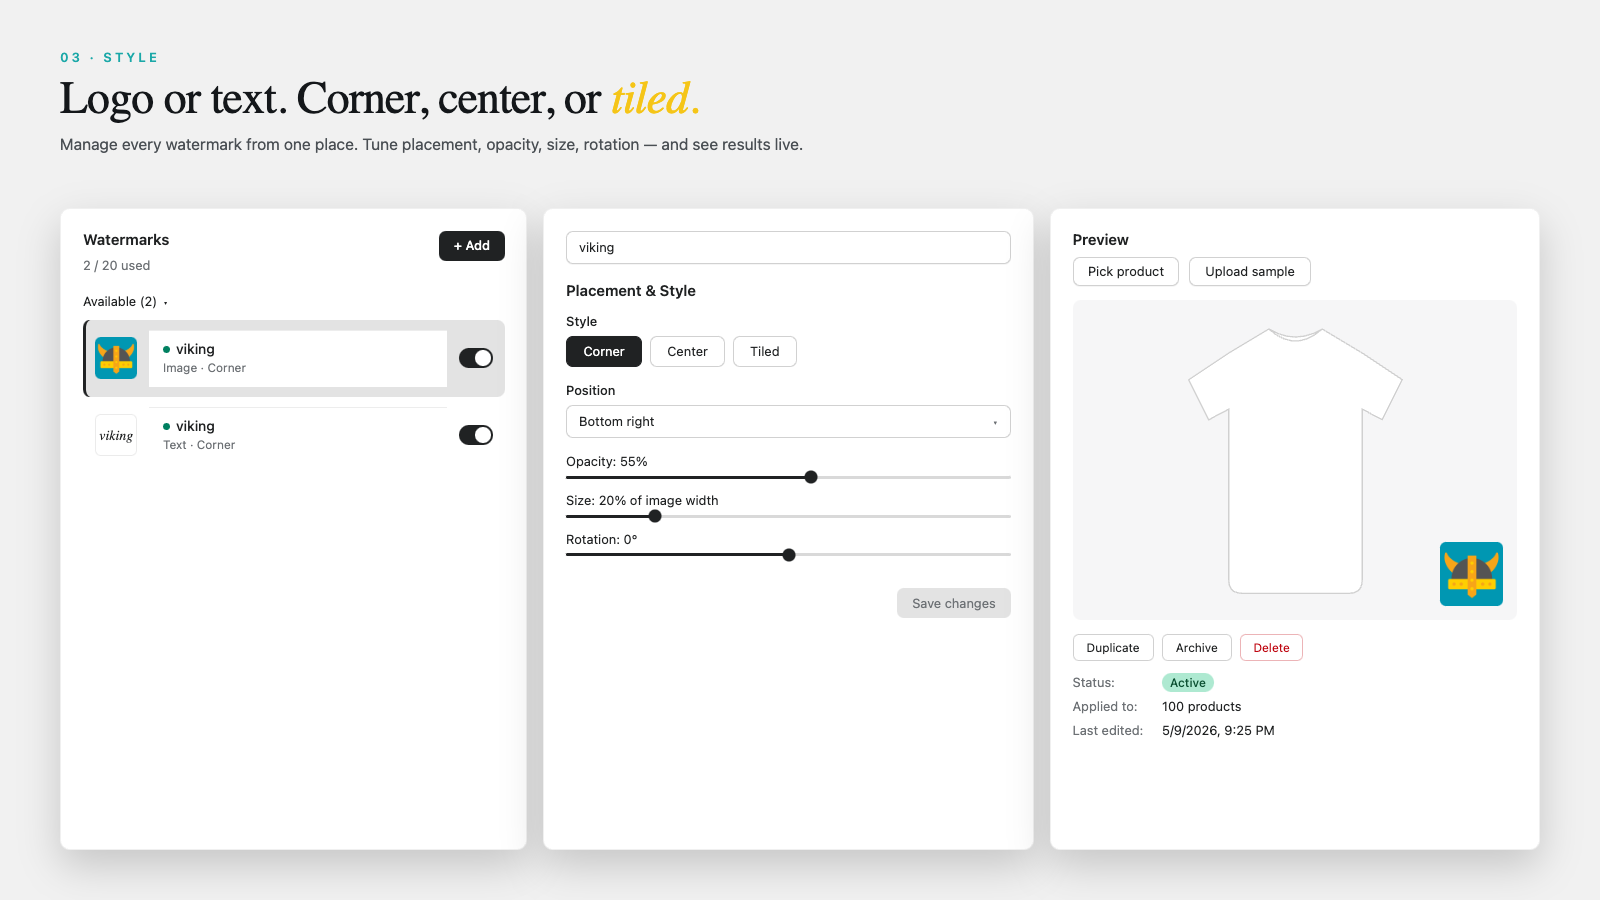
My honest take? Corner marks look the best and stop almost nobody, because anyone can crop the bottom inch off an image in two seconds. Tiled marks are ugly but they actually work, because a tile pattern across the whole frame cannot be cropped away without destroying the photo. Most brands land on a low-opacity center or corner mark for the storefront and save tiling for the images they care about most. Opacity around 30 to 50 percent usually reads as present without looking like a stock-photo demo.
Auto-watermark new uploads
This is the feature that actually keeps a catalog protected over time. Bulk-watermarking once is great, but you add new products every week. Without automation, every new upload arrives naked, and you forget to mark it, and three months later half your newest (and best-selling) products have no protection at all.
Auto Watermark watches for new product images and applies your template the moment they are uploaded. Set it once, then ignore it. We built this because the manual workflow always decays. People are disciplined for two weeks and then real life happens. A rule that runs on upload does not get tired or distracted.
If you run a high-volume catalog and add products in big batches, pair auto-watermark with your normal import routine. The same way you would export product images by vendor or collection for a supplier, you want protection applied at ingest, not as a cleanup job later.
Rollback and keeping originals safe
Here is the part that should decide which app you trust: what happens to your originals. A watermark app that bakes the mark into your only copy is a liability. One bad opacity setting applied to 2,000 images and you are re-shooting product photos.
Viking Watermark copies every original into Shopify Files before it touches anything. So rollback is real, not a promise. You can restore a single product or the whole catalog to its clean originals in one click, with no quality loss, because it swaps the stored original back in rather than trying to un-stamp a JPEG (which is impossible). And if you ever uninstall, you can roll back first so your store is left with clean images.
Why does this matter so much? Because watermarking is one of the few image operations that is destructive by nature. Compression you can redo. A rename you can reverse. But a pixel painted over a product photo is gone unless the original was saved separately. Treat “originals preserved” as a hard requirement, not a nice-to-have.
What it costs
Viking Watermark runs on a flat monthly price by image volume, not by your Shopify plan. There is a free tier to start.
| Plan | Price | Images / month | Designs | Bulk + auto |
|---|---|---|---|---|
| Free | $0 | 100 | 2 | No (single only) |
| Starter | $5/mo | 1,000 | 5 | Yes |
| Growth | $15/mo | 5,000 | 20 | Yes |
| Pro | $30/mo | 20,000 | 50 | Yes |
Storefront protection (blocking or disabling right-click and image saving) is on every plan, including free. Annual billing saves about 17 percent. For a one-time bulk run, you can subscribe to a tier that covers your image count for a single month and then drop back down. Storefront protection and rollback stay available even on free.
The Google Shopping trap
Before you bulk-apply to your whole catalog, know this: Google Merchant Center does not allow watermarks or logos on product feed images. Their policy is explicit that promotional text, logos, and watermarks that obstruct the product will get a listing disapproved, and image problems already account for roughly 65 percent of all Merchant Center disapprovals. So a catalog-wide watermark on your main images can quietly knock you out of Google Shopping.
The fix is not to skip watermarking. It is to be selective. Watermark the secondary gallery shots, keep the primary feed image clean, or use rollback to restore clean originals before a feed sync. Run your products through our free Shopify shopping feed checker and image audit tool to see which images are feeding into Merchant Center first. We go deeper on this in the dedicated post linked below.
And while you are tidying images: protecting them is only half the battle if the wrong photo shows for the wrong variant. If a shopper picks the blue shirt and still sees the red one, that is a conversion problem no watermark solves. That is what variant image filtering on the product page handles, and for stores juggling color and size across many SKUs, combined listings keep the catalog clean. Protected, correct, and well-structured images. That is the full picture.
FAQ
Does Shopify have a built-in watermark tool?
No. Shopify has no native watermarking feature for product images. You need an app like Viking Watermark, or you edit each image manually in Photoshop or a similar tool.
Can I undo a bulk watermark?
Yes, if the app saved your originals. Viking Watermark copies every original to Shopify Files before applying the mark, so you can restore a single product or the entire catalog in one click with no quality loss.
Will watermarking lower my image quality?
The visible mark is the only change. Rollback restores the exact original because it swaps the stored file back in rather than reprocessing the watermarked one, so there is no extra compression loss.
Which image formats are supported?
JPEG, PNG, WebP, and GIF, which matches what Shopify itself supports for product media.
Will a watermark hurt my Google Shopping listings?
It can. Google Merchant Center disapproves feed images that carry watermarks or logos over the product. Keep your main feed image clean, watermark only secondary images, or roll back to originals before syncing your feed.
Related reading
- Do watermarks hurt Shopify SEO and Google Shopping?
- How to stop image theft on your Shopify store
- Shopify product image SEO guide
- Shopify variant images FAQ
- Shopify Combined Listings explained
Set the design once, let auto-watermark handle the rest, and keep your originals where you can get them back. Then go check your Merchant Center feed before you celebrate.

Umid
Co-Founder at Craftshift