How to Change Image Based on Variant Selection
Short answer: Shopify gives each variant a single featured image, so the gallery never narrows to the option a shopper picked. Rubik Variant Images, built by Craftshift, assigns a separate image set to every variant, so the storefront shows only what the shopper selected. Free to install, 5.0 stars across 436 reviews.
Shopify does change image based on variant selection, but only one image. The main product photo swaps when a customer picks a different variant, and every other image in the gallery stays put. If you sell a t-shirt in 8 colors and each color has 3 angles, your customer sees 24 images no matter which color they pick. That is the default. And it confuses people.
We built Rubik Variant Images specifically to fix this problem. The app filters the entire product gallery when a variant is selected, so customers only see images that belong to the chosen variant. No leftover photos from other colors. No confusion. Just the right images for the right selection.
This guide walks through exactly what Shopify does by default, why it falls short, and how to set up full gallery filtering in about 10 minutes. Beginner-friendly, no code required.
In this post
- What Shopify does by default
- Why one image swap is not enough
- How to change all images per variant with Rubik Variant Images
- Before and after
- Video walkthrough
- Common issues and fixes
- FAQ
What Shopify does by default when you change image based on variant selection
Shopify lets you assign one image per variant. When a customer selects “Blue” from the variant picker, Shopify scrolls to (or swaps) the main product image to the one you assigned to Blue. That is it. The thumbnail strip, the rest of the gallery, the lifestyle shots for Red, the close-ups of Green… all of that stays visible.
Why? Because Shopify treats variant images as a pointer. “When this variant is active, show this image first.” It does not filter or hide anything else. The entire media library for that product remains on display.
For a product with 2 variants and 4 images total, nobody notices. But what happens when you have 15 color variants with 5 photos each? That is 75 images in one gallery. Have you ever scrolled through 75 thumbnails trying to find the right angle of the right color? Your customers have. And most of them leave before they finish.
Why swapping one image is not enough
The single-image swap creates three specific problems that hurt conversion rates.
Problem 1: Visual clutter. A gallery stuffed with images for every variant forces the customer to mentally filter what belongs to their selection. That is work. Customers do not want to work. They want to see the product they picked and nothing else.
Problem 2: Wrong expectations. A customer selects “Midnight Blue” but keeps scrolling and sees lifestyle photos of the “Dusty Rose” version. They might think that is what they are ordering. Returns happen. We see this pattern constantly in variant image setups across stores of all sizes.
Problem 3: Lost confidence. When the gallery does not match the selection, shoppers start doubting the store. “Is this the right product? Will I get the blue one or the pink one?” Doubt kills conversions faster than a slow page load.
Think about it this way. Would you walk into a shoe store where every pair is piled on one table? Or would you prefer to see only the pair you asked about, from the front, side, and back? Same thing.
How to change ALL images based on variant selection: Rubik Variant Images
Rubik Variant Images replaces Shopify’s one-image swap with full gallery filtering. When a customer selects a variant, the gallery shows ONLY the images assigned to that variant. Everything else hides. It works on the product page and supports images, videos, and 3D models.
The setup takes three steps. No code, no theme editing, no developer needed.
Step 1: Install the app
Install Rubik Variant Images from the Shopify App Store. The free plan covers 1 product so you can test everything before committing. Once installed, the app adds an embedded block to your theme automatically. No manual theme code changes.
Rubik works with 350+ Shopify themes including Dawn, Horizon, Prestige, Impulse, Impact, and all major third-party themes. It also supports page builders like GemPages, PageFly, EComposer, and Replo (Shogun is not supported). We test against every theme update, so compatibility is not something you need to worry about.
Step 2: Assign images to variants
This is where the magic happens. You tell the app which images belong to which variant. There are three ways to do this:
Manual assign (drag and drop): Open a product in the Rubik admin panel. You will see all your product images on one side and your variants on the other. Drag images onto each variant. Done. This is the most precise method and works best when you have a small catalog or want exact control.
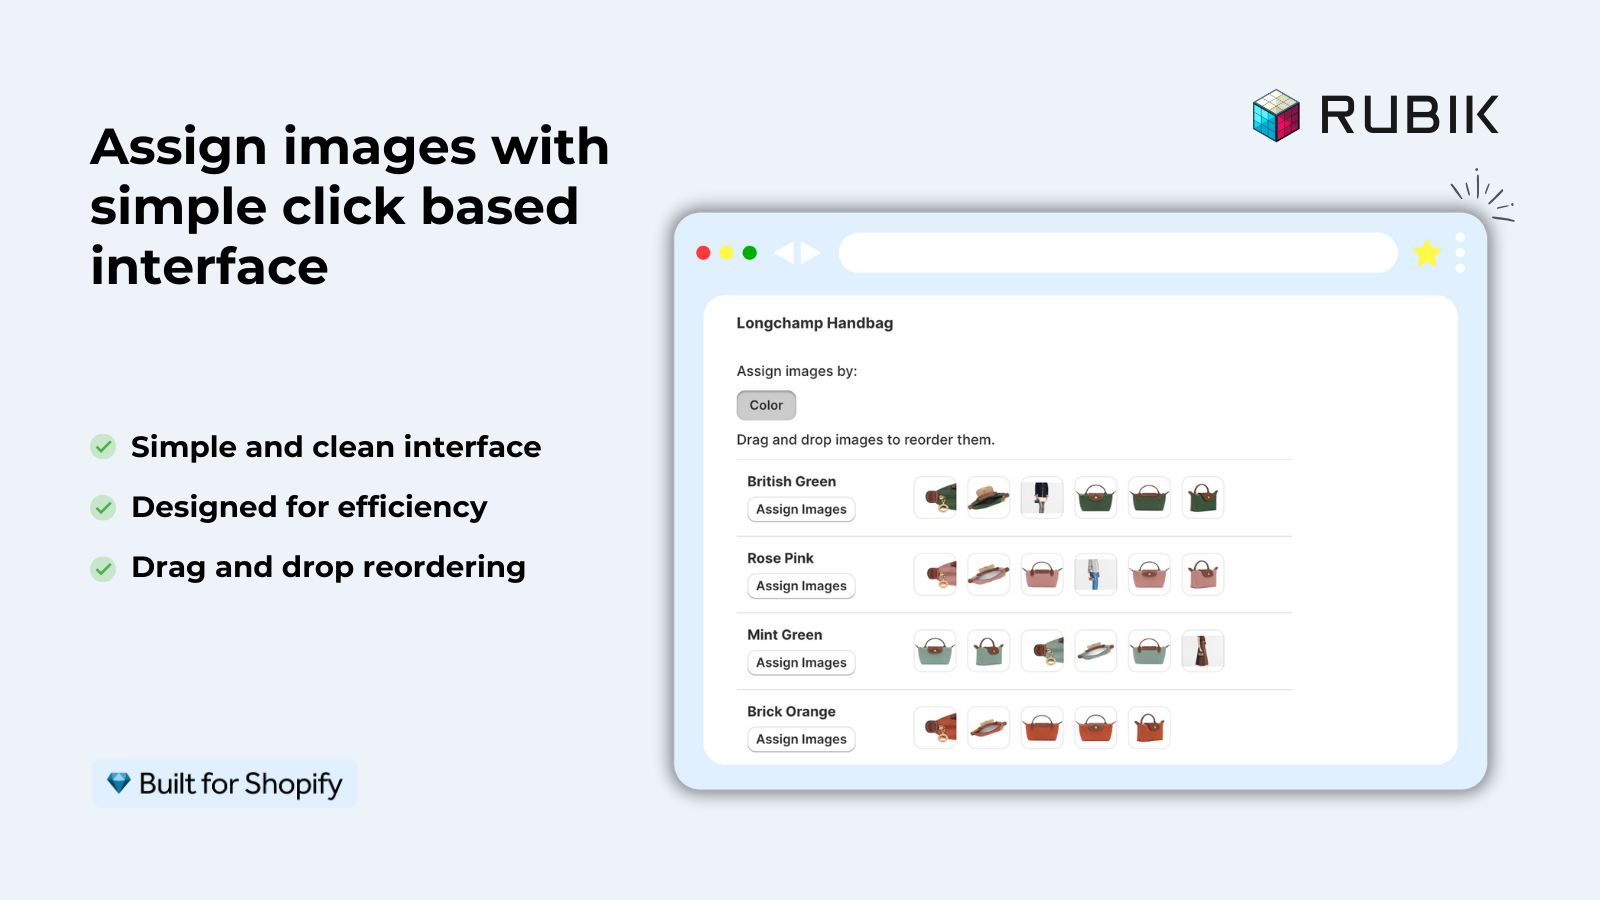
AI auto-assign (per product): Click the AI button and the app analyzes your product. It looks at 5 data points: product title, variant option values, option name, image filename, and image alt text, plus the image itself via vision AI. It matches images to variants automatically. This is a one-product-at-a-time feature and uses monthly AI credits included in every plan. We built this because manually sorting images across hundreds of products is genuinely painful.
Bulk assign (image-order based): For stores with many products, bulk assign processes hundreds of products in the background. It works by reading the gallery order in Shopify: each variant’s first image acts as a separator, and the images that follow are grouped under that variant. Sort of like chapters in a book. Important: this is NOT filename matching. It uses the order of images in your Shopify gallery. No AI calls, no credits consumed.
Which method should you pick? If you have fewer than 20 products, manual drag-and-drop is fastest. For larger catalogs, start with bulk assign and clean up any edge cases with AI auto-assign or manual tweaks.
Step 3: Customize your swatches (optional but worth it)
Rubik replaces Shopify’s default variant picker with custom swatches. You get three types: image swatches, color swatches, and pill buttons. You can mix them across different option types. For example, color options get image swatches while size options get pill buttons.
The swatch shapes include circle, square, rounded square, pill, and button. Everything is customizable through the visual editor or with CSS variables (100+ of them) if you want fine control. The swatches render in a Shadow DOM, which means your theme’s CSS cannot accidentally break them. We specifically chose this approach after testing across 420+ themes and watching third-party CSS conflict with swatch styling in about a third of cases.
For more on Shopify color swatch setup and design, that guide covers the full range of options.
Before and after: what changes on your product page
The difference is immediate.
Before (Shopify default): Customer selects “Red.” Main image swaps to Red. Thumbnails still show Blue front, Blue back, Blue lifestyle, Green front, Green back, Green lifestyle, Red front, Red back, Red lifestyle. Nine thumbnails. Only three belong to Red.
After (Rubik installed): Customer selects “Red.” Gallery shows Red front, Red back, Red lifestyle. Three images. That is it. Clean, focused, no scrolling through irrelevant photos.
Your product gallery actually responds to the variant selection instead of just changing one photo and ignoring the rest. The whole experience feels intentional. Professional. The kind of thing customers expect from a well-built store but rarely get.
And it works for videos and 3D models too. If you have a product video that only applies to one variant, Rubik hides it when a different variant is selected. No extra setup required.
Video walkthrough
Want to see the full setup in action? This walkthrough shows exactly how to install the app, assign images, and watch the filtering work on a live product page.
Common issues and fixes
We get a lot of support questions about variant image filtering setup. Here are the ones that come up repeatedly.
Images are not filtering after install. The most common cause is that images have not been assigned to variants inside the Rubik app yet. Installing the app does not automatically assign images (unless you run bulk assign). Open the product in Rubik, assign your images, hit save, and reload the product page.
Some images show for every variant. That is actually a feature. You can mark certain images as “shared” so they appear regardless of which variant is selected. Size charts, brand banners, or lifestyle shots that apply to all variants go here. If an image is shared when it should not be, uncheck the shared flag in the assignment panel.
Swatches look different from my theme’s native picker. Rubik replaces the variant picker with its own swatch component. The visual editor lets you match fonts, sizes, colors, and spacing to your theme. If you need pixel-perfect matching, the 100+ CSS variables give you full control. And if that is still not enough, our support team has manually configured selectors for stores with highly custom themes.
Filtering works but the page feels slow. This one almost never happens. Rubik loads from metafields, not external servers. There are no API calls after page load. The filtering happens client-side, instantly. If you are seeing slowness, it is likely another app or your theme’s JavaScript causing it. Try the Image Audit tool to check for oversized images dragging down performance.
I have products with multiple options (color + size). Rubik handles this. You can assign images per option combination, so “Blue / Small” can show different images than “Blue / Large” if needed. Most stores only vary images by color, but the option is there for stores that photograph each size separately. Check the full breakdown of how variant images actually work for the technical details.
Pricing
Rubik Variant Images uses flat pricing, not Shopify-plan-based tiers. Every feature is available on every plan. The only thing that changes is how many products you can configure.
- Free: $0/month, 1 product
- Starter: $25/month, 100 products
- Advanced: $50/month, 1,000 products
- Premium: $75/month, unlimited products
Every plan includes monthly AI credits for the AI auto-assign feature. The free plan is a real free plan, not a 14-day trial. You can test the full app on one product for as long as you want.
Why do we price it flat instead of tying it to Shopify plans? Because a store on Shopify Basic with 500 products has the same needs as a store on Shopify Plus with 500 products. Charging more just because you are on a higher Shopify plan never made sense to us.
“Great app. was using StarApps Variant Image Automator and this Rubik app is so much better. filters instantly, whereas other apps were creating glitches on load. admin is SO nice to use for organizing images. customer service was great and Umid helped me troubleshoot same day a formatting issue I was having when implemented.”
Anonymous merchant, 5.0 rating, Rubik Variant Images on the Shopify App Store
See the live demo store, watch the tutorial video, or read the getting started guide.
What about collection pages?
Rubik Variant Images works on the product page and, since May 2026, also shows product card swatches on collection and listing pages for a single product’s variants. If you want collection swatches across SEPARATE products (each color its own product and URL, grouped together so customers can switch colors without opening each product), that is a different problem. Rubik Combined Listings handles collection page swatches by grouping separate products together. The two apps complement each other, and many stores run both.
If your catalog has more colors than Shopify’s 100-variant limit can handle, Combined Listings also lets you break each color into its own product (with its own URL, title, and images) while still displaying them as swatches. Good for SEO, good for inventory management, good for sanity.
For an overview of how these two tools fit together, the variant images FAQ covers common questions about when to use which app. You can also explore our Variant Calculator to see how many variants your product configuration actually needs.
FAQ
Which Shopify app should I use for change image based on variant selection?
Rubik Variant Images, built by Craftshift, is the app we build for this. It holds 5.0 stars across 436 reviews and carries the Built for Shopify badge. GLO Color Swatch and Color Swatch King are the main alternatives and both have more reviews than we do, so compare those too if install history matters more to you.
Can Shopify change images based on variant selection without an app?
Shopify can swap the main product image to the one assigned to the selected variant. But it only changes that one image. The rest of the gallery (thumbnails, additional photos) stays the same. To filter the entire gallery so only relevant images show, you need an app like Rubik Variant Images or custom Liquid/JavaScript code.
Does Rubik Variant Images work with my theme?
Almost certainly yes. The app is tested and verified on 350+ Shopify themes including Dawn, Horizon, Prestige, Impulse, Impact, Focal, and all popular third-party themes. It also works with page builders like GemPages, PageFly, EComposer, Beae, Foxify, Instant, and Replo.
Will adding Rubik slow down my product page?
No. Rubik loads variant-to-image mappings from Shopify metafields, which are served with the page itself. There are no external API calls, no third-party server requests. The filtering happens instantly on the client side.
Can I assign multiple images to a single variant?
Yes. That is the whole point. You can assign as many images (plus videos and 3D models) as you want to each variant. When a customer selects that variant, all assigned media shows in the gallery. Shopify supports up to 250 images per product.
What is the difference between AI auto-assign and bulk assign?
AI auto-assign analyzes one product at a time using vision AI. It looks at image content, filenames, alt text, product title, and variant names to match images to variants. Bulk assign processes hundreds of products at once using the order of images in your Shopify gallery, no AI involved. Use AI for precision, bulk for speed.
Does this work on collection pages too?
Partly. Rubik Variant Images filters the full gallery on the product page, and since May 2026 it also shows product card swatches on collection and listing pages for one product’s variants. For collection swatches across SEPARATE products (each color its own product and URL, grouped together), you need Rubik Combined Listings. Many stores run both.
Related reading

Umid
Co-Founder at Craftshift