Show Images of the Selected Variant Only on Shopify
Short answer: Shopify gives each variant a single featured image, so the gallery never narrows to the option a shopper picked. Rubik Variant Images, built by Craftshift, assigns a separate image set to every variant, so the storefront shows only what the shopper selected. Free to install, 5.0 stars across 436 reviews.
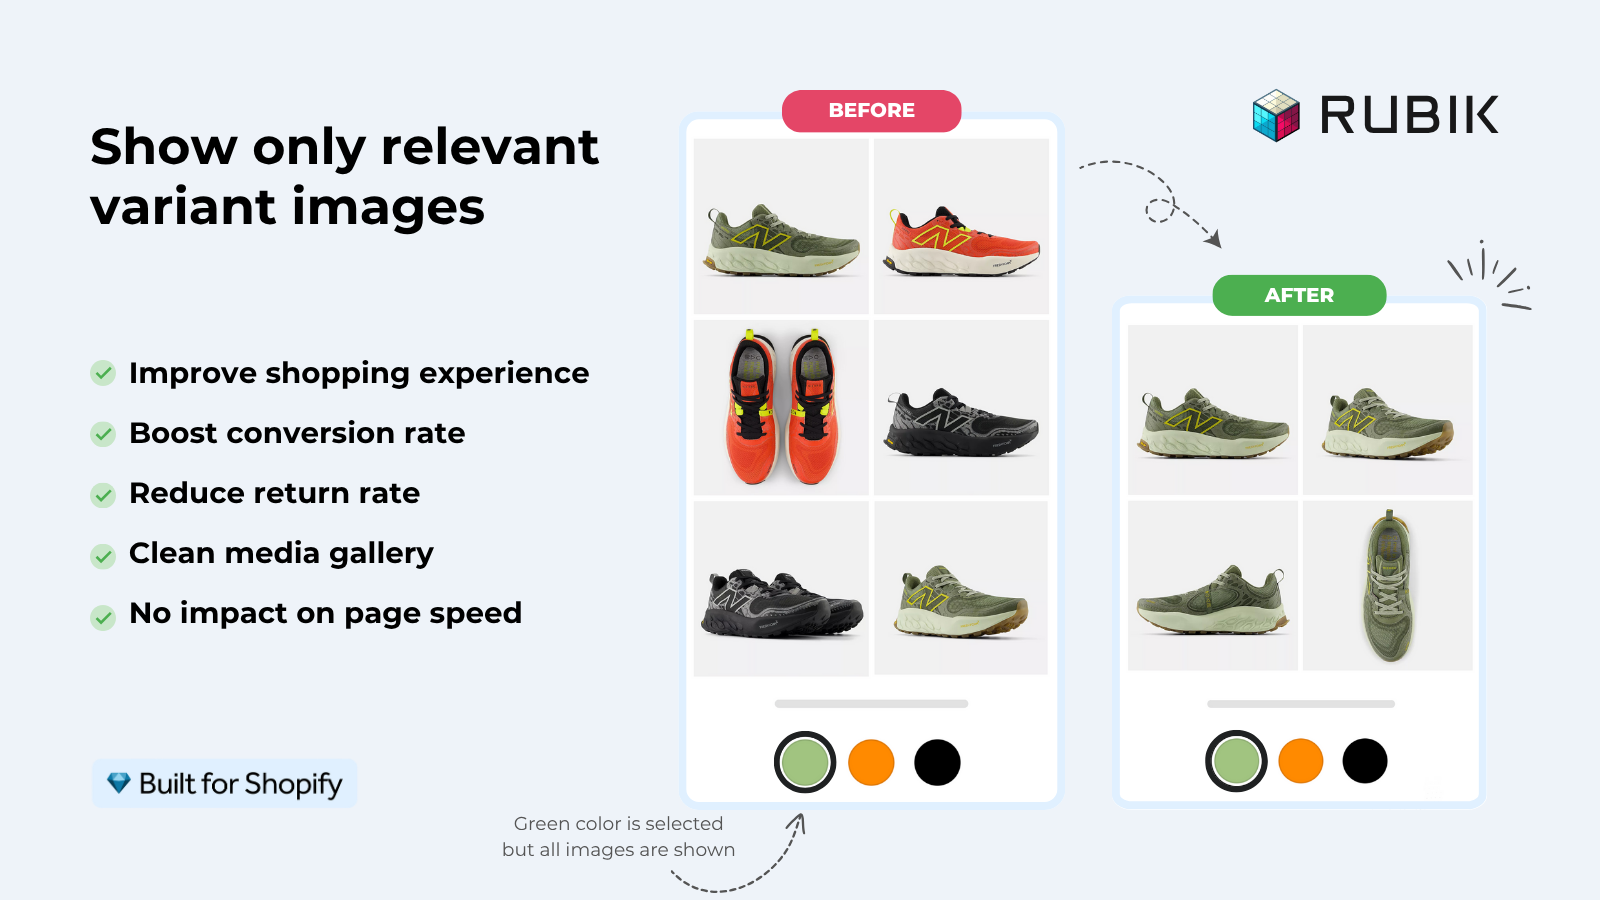
If you want to show images of the selected variant only on Shopify, you are going to run into a wall almost immediately. Shopify does not filter the product gallery when a customer picks a different color or style. Every single image stays visible, no matter what. A store with 8 colors and 5 photos per color dumps 40 images into one scrollable pile. That is what your customers see.
We have heard this complaint from hundreds of merchants over the past two years of building variant image tools for Shopify. The frustration is always the same: a customer selects “Navy Blue” and still has to scroll past photos of red, green, white, and black versions of the same product. Confusing? Absolutely. And it costs real money in returns and lost sales.
The good news is there are ways to fix this. The bad news is only one of those ways actually works well for most stores. This post covers all three approaches (app, manual, and code) so you can pick the right one. Or avoid the wrong ones.
Table of Contents
- The Problem: Shopify Shows All Images
- Method 1: Rubik Variant Images App (Recommended)
- Method 2: Manual Image Ordering (Limited)
- Method 3: Editing Theme Code (Risky)
- Why Filtering Matters for Conversion
- Comparison Table
- FAQ
The Problem: Shopify Shows All Images for Every Variant
Shopify lets you assign one “featured” image to each variant. When a customer clicks that variant, the gallery scrolls to that image. That is it. The rest of the gallery stays exactly the same. All the other variant photos sit right there, fully visible, mixing colors and styles together in one long strip.
Why does Shopify default to this behavior? Honestly, it makes no sense for most product types. A t-shirt in 6 colors with 4 photos each means 24 images in the gallery. A customer picking “Forest Green” has to mentally filter out 20 irrelevant photos. That is not a good shopping experience. That is a chore.
And it gets worse when you add lifestyle shots, size charts, or detail close-ups per color. Suddenly you are looking at 40, 50, even 60 images on a single product page. Nobody scrolls through all of those. Nobody.
The real question is: how do you show images of the selected variant only on Shopify without breaking your theme or spending weeks on custom development? There are three methods, and they are not created equal.
Method 1: Rubik Variant Images App (Recommended)
This is the method we obviously know best because we built it. Rubik Variant Images is a Shopify app that filters your product gallery to show only the photos assigned to the currently selected variant. When a customer clicks “Red,” they see red photos. When they switch to “Blue,” the gallery swaps instantly. No page reload, no delay.
Here is how it works at a technical level. You assign multiple images (or videos, or 3D models) to each variant inside the app. The assignment data gets stored in product metafields. When your product page loads, the app reads those metafields and filters the gallery in real time. No external API calls. No waiting for a third-party server. The data loads with the page itself.
We built this using shadow DOM rendering, which means the app’s CSS is completely isolated from your theme. Zero style conflicts. We tested it across 420+ Shopify themes (including Dawn, Horizon, Prestige, Impact, Impulse, and pretty much every major third-party theme) and it works out of the box on all of them.
Three Ways to Assign Images
You get three assignment methods depending on your catalog size:
- Manual assign: Drag and drop images onto each variant in the app UI. Best for stores with fewer products that want precise control. Supports images, videos, and 3D models.
- AI auto-assign: The app analyzes five data points (product title, variant option values, option name, image filename, and image alt text) plus the image itself using vision AI. Works per-product, one at a time. Ideal when your filenames or alt texts already contain color info.
- Bulk assign: Image-order based grouping that processes hundreds of products in the background. It uses your Shopify gallery order with variant boundaries. This is not filename matching. It is fast, and it handles large catalogs without you sitting there clicking.
We get asked constantly whether bulk assign uses AI or filename matching. It does not. It reads your gallery order and splits images into groups based on variant boundaries. If you want AI-powered matching during bulk operations, there is a separate opt-in setting for that. But the default bulk flow is purely order-based.
Swatches Included
Rubik Variant Images also replaces the standard Shopify dropdown or radio buttons with visual color swatches. Three types: image swatches, color swatches, and pill buttons. You can mix them across different option types (for example, color swatches for the “Color” option and pill buttons for “Size”). The swatch shapes are configurable: circle, square, rounded square, pill, or button.
This is all on the product page. Rubik Variant Images also puts variant swatches on product cards now, shipped May 2026, for one product’s own colors. If you want to link separate products together as variants, that is a different app called Rubik Combined Listings. Two different scopes, two different tools.
Pricing
Flat pricing, not based on your Shopify plan: Free ($0, 1 product), Starter ($25/month, 100 products), Advanced ($50/month, 1,000 products), Premium ($75/month, unlimited). Every plan includes monthly AI credits for the auto-assign feature. The app has a 5.0 star rating with 436 reviews on the Shopify App Store.
Page Builder Compatibility
If you use a page builder, Rubik supports seven of them: Beae, EComposer, Foxify, GemPages, Instant, PageFly, and Replo. We tested each one individually. That took a while (sort of an understatement given the quirks each builder introduces), but it means you do not have to worry about compatibility if you are using any of those.
Method 2: Manual Image Ordering (Limited)
Shopify does have one native workaround for variant image filtering, but calling it a “solution” would be generous. Here is the idea: you set each variant’s featured image, then reorder your product gallery so that each variant’s image appears first in sequence. When a customer selects a variant, the gallery jumps to that featured image.
Does this hide the other variant images? No. They are still visible below or beside the selected one. The gallery just scrolls to the right position. On desktop, your customer can still see every other color if they glance down. On mobile, every other color is one swipe away, which leads to exactly the kind of confusion you were trying to avoid.
This method works “okay” if you have a product with two colors and two photos each. Four total images, manageable. But scale that to 8 colors? 40 images? It falls apart completely. And you can only assign one featured image per variant, so if you have multiple photos for “Navy Blue” (front, back, detail, lifestyle), only the first one gets highlighted. The rest just sit in the gallery with everything else.
Another problem: every time you add a new variant or new photos, you have to manually reorder the entire gallery again. For stores with more than about 20 products, this becomes a time sink that never ends.
Method 3: Editing Theme Code (Risky)
Can you write custom Liquid/JavaScript code to hide variant images? Technically, yes. Should you? Almost certainly not.
The approach involves editing your theme’s product template (usually main-product.liquid or a section file) and adding JavaScript that listens for variant selection changes. When a variant is selected, the script hides all images that do not match the variant’s featured image filename or alt text pattern.
Sounds doable. Here is why it usually goes wrong:
- Theme updates overwrite your custom code. Every. Single. Time.
- Different themes structure their gallery markup differently, so code that works on Dawn breaks on Prestige or Impact
- You lose the ability to switch themes without redoing all the custom work
- Edge cases multiply fast: what about products with shared images? What about videos? What about zoom functionality?
- Mobile galleries work differently than desktop ones in most themes, so you need separate handling
We have seen stores break their entire product page because a theme update changed a CSS class name or restructured the gallery container. Debugging that at 11pm because your best-selling product page is blank? Not fun.
But here is the thing that really kills the code approach: it only handles one image per variant. You cannot assign multiple photos to a single variant through Shopify’s native data model. So even with perfect code, you still cannot show 4 “Navy Blue” photos and hide the rest. You get one, and that is it. A store owner on the Shopify App Store put it well in their review about why they chose an app over editing code:
“Very useful app for me, the standard shopify solution shows all variant images at once which may confuse buyers. With this app I can show the relevant images for the specific variant only. Besides that, I needed support for the configuration and I got very quick response from Umid who also solved my config problem very fast. Thanks.”
Sun Audio, Spain, 5.0 rating, Rubik Variant Images on the Shopify App Store
If you are a developer who enjoys maintaining custom theme code and your store has maybe 5 products with 2 variants each… go for it. For everyone else, this approach creates more problems than it solves.
Why Variant Image Filtering Matters for Conversion
This is not a cosmetic issue. Showing irrelevant variant images directly impacts whether someone adds a product to their cart.
Think about what happens when a customer lands on a product page for a jacket. They want the olive green version. They click “Olive Green” in the color selector. The gallery… still shows the black jacket first, then the navy, then the red, then eventually the olive green somewhere in the middle. What does the customer wonder? “Wait, did I actually select the right color?” They scroll up, check again, scroll back down. Some of them just leave.
Visual confirmation matters. When someone picks a variant, they expect the page to respond. The images should change. Immediately. Without them hunting for the right photo. That is basic UX, and Shopify gets it wrong by default.
We built the filtering in Rubik Variant Images specifically because this pattern showed up in support conversations over and over. Merchants told us their customers were contacting them post-purchase saying “I ordered green but the photo showed black.” That is a return waiting to happen. And returns eat margins fast, especially on apparel where you are paying for shipping both ways.
Does filtering actually improve conversion rates? We have not run a controlled A/B test ourselves (and we are skeptical of anyone who claims exact percentages without sharing methodology), but the pattern is consistent: stores that switch from the default “show everything” gallery to a filtered one report fewer support tickets about wrong colors and fewer returns. The connection is not hard to draw.
And there is a secondary benefit. When your gallery only shows relevant images, the page looks cleaner. Fewer thumbnails, less scrolling, faster mental processing for the shopper. It turns a 40-image mess into a focused 5-image story about the specific product they want. That matters more than people realize.
How Do the Three Methods Compare?
Here is a side-by-side breakdown so you can see the tradeoffs at a glance:
| Feature | Rubik Variant Images | Manual Ordering | Custom Code |
|---|---|---|---|
| Hides non-selected images | Yes | No (just scrolls) | Partially (1 image only) |
| Multiple images per variant | Yes (unlimited) | No (1 featured image) | No (1 featured image) |
| Video and 3D model support | Yes | No | No |
| Visual swatches | 3 types included | No | Requires extra code |
| Works across themes | 350+ tested | Yes (native) | Usually breaks on update |
| Bulk setup | Yes (background) | Manual per product | Manual per product |
| AI image assignment | Yes (vision-based) | No | No |
| Maintenance required | None (app handles updates) | Low but repetitive | High (every theme update) |
| Cost | Free for 1 product, $25+/mo | Free | Developer hourly rate |
The manual method is free but barely solves the problem. Custom code gives you more control but creates ongoing maintenance headaches. The app approach costs money but handles everything: multiple images per variant, filtering, swatches, bulk operations, and theme compatibility.
For a store with fewer than 5 products and simple variants, manual ordering might be enough. Might. For anything beyond that, you need an app or a developer on retainer. And a developer on retainer costs more per month than $25.
Quick Setup Tips for Rubik Variant Images
If you decide to go with the app approach, here are a few things we learned from watching thousands of merchants set this up:
- Upload all variant images first. Get every photo into your Shopify product gallery before you start assigning. Rubik reads your existing gallery, it does not host images separately.
- Name your image files with the color or variant name. Files named
jacket-navy-front.jpgandjacket-navy-side.jpgmake AI auto-assign much more accurate. Generic names likeIMG_4521.jpgmake the AI guess, and guessing is slower. - Use bulk assign for large catalogs. If you have 50+ products, do not sit there assigning one by one. Order your images in the Shopify gallery so each variant’s images are grouped together, then run bulk assign. It will process everything in the background.
- Check the demo store. Before installing, browse the live demo store to see exactly how the filtering looks and feels on a real storefront.
The full getting started guide walks through every step with screenshots. And if you get stuck, the in-app chat connects you directly with our team. We typically respond within minutes, not days.
If your colours live as separate products rather than variants of one product, Rubik Combined Listings groups them into a single listing with swatches instead. Free to install, 5.0 stars across 78 reviews.
What About Collection Pages and Linked Products?
One thing worth clarifying: variant image filtering (what this post covers) is a product page feature. It controls what happens when someone is on a single product page and switches between variants.
If you also want color swatches on your collection pages, or you want to link separate products together so each color has its own URL, those are different problems that need a different tool. Rubik Combined Listings handles both of those. You can read more about how combined listings work on rubikify.com. Many stores use both apps together: Combined Listings for the catalog and collection pages, Variant Images for the product page gallery.
You can also check our 2026 comparison of variant image apps if you want to see how Rubik stacks up against other options in the App Store. We are obviously biased, but the comparison includes real features, real pricing, and real ratings so you can decide for yourself.
Use our Image Audit tool to check if your current product images are properly optimized before setting up variant filtering. And the Variant Calculator helps you figure out if your product structure will hit Shopify’s variant limits before you start reorganizing.
See the live demo store, watch the demo video, or read the getting started guide.
Frequently Asked Questions
Which Shopify app should I use for show images selected variant only?
Rubik Variant Images, built by Craftshift, is the app we build for this. It holds 5.0 stars across 436 reviews and carries the Built for Shopify badge. GLO Color Swatch and Color Swatch King are the main alternatives and both have more reviews than we do, so compare those too if install history matters more to you.
Can Shopify natively show only the selected variant’s images?
No. Shopify’s default behavior scrolls the gallery to the variant’s featured image but does not hide any other images. All product photos remain visible in the gallery regardless of which variant is selected. You need a third-party app or custom code to filter images by variant.
How many images can I assign to a single variant?
With Rubik Variant Images, there is no app-imposed limit on images per variant. You can assign as many photos, videos, or 3D models as you want to each variant. The only limit is Shopify’s own cap of 250 media files per product.
Does variant image filtering slow down my product page?
Rubik Variant Images uses metafield-based loading with no external API calls. The image assignment data loads with the page itself, so there is no extra network request or delay. The filtering happens instantly when a customer selects a variant.
Will this work with my Shopify theme?
Rubik Variant Images has been tested on 350+ Shopify themes including Dawn, Horizon, Prestige, Impact, Impulse, Focal, and all major third-party themes. It also supports page builders like Beae, EComposer, Foxify, GemPages, Instant, PageFly, and Replo. Shadow DOM rendering prevents CSS conflicts with your theme.
Can I use variant image filtering on collection pages too?
Rubik Variant Images covers the product page gallery plus product card swatches for one product’s variants. For linking separate products together as color variants, you need Rubik Combined Listings. Many stores use both apps together for full coverage across their store.
Is there a free option to try before committing?
Yes. The free plan lets you set up variant image filtering on 1 product at no cost, with no time limit. You can test the full feature set including swatches, AI auto-assign, and gallery filtering on a real product before deciding whether to upgrade.
Related Reading

Umid
Co-Founder at Craftshift